Table of Contents:
- Create Course
- Import Course Content (copy content from another course)
- Update Due Dates
- Publish Course
- Add Additional Users (TA’s, Instructors, Designers)
For all steps in this document, begin by navigating to carmen.osu.edu, click Login and enter your Ohio State username (lastname.#) and password.
Key Terms in this document
Create Course: An empty course shell will automatically be created in Carmen for every course in the Registrar’s system. Before you can do anything with this course shell, you must create the course. Creating a course will not make the course visible to students (see publishing a course).
Unpublished Course: Once created, a course will remain Unpublished until you decide to publish the course. The Unpublished course status allows for you to work in your course before students have access to the course. Student’s will be auto-enrolled in the course, but will not be able to see the content of the course until you publish the course.
Published Course: Publishing a course allows enrolled students to access the course and any course materials (modules, assignments, etc.) that you have published within the course. Please note, you will not be able to send course communication (announcements, messages) within the course until the course is published.
Enrollment: Registered students will be automatically enrolled in your course, based on information from the Registrar. Student registrations will populate and update each night. Enrolled students will show under the “People” tab in your course.
- Unpublished courses will show enrolled students in the “People” tab of your course, but course content will not be visible to students until the course is published.
- Instructors and TA’s listed in SIS will also be automatically enrolled in the course, and content will be visible to them prior to publishing the course. To add additional individuals to the course, see the section in this document on Adding Additional Users.
Create Course
An empty course shell will automatically be created in carmen for every course in the Registrar’s system. Before you can do anything with this course shell, you must create the course.
- Creating a course will not make the course visible to students (you must publish the course to make it visible to students, see Publish Course section of this document).
Steps to Create Course (screenshots below correspond with numbered steps)
- Locate your course, search by course name and/or number from the Carmen “My Courses” dashboard
- Narrow your search by only selecting the current term and making sure the “Not Created” status is selected if the course has not been created.

If the course has not been created, the status listed next to the course will state “Not Created”.
- Click the gear icon to the right of the course you’d like to create
- Clicking the gear icon will expand the create course dialogue box

- Select “Canvas” as the LMS
- Select the “Create Course” button

- Select the source to make your course as “with an Empty Shell”
- Select the “Create Course” button
- The Create button will display your course name

- Your created course status will now display as “Unpublished” instead of “Not Created”

Import Course Content
You can import specific content or a full course (possibly from a Master course) into another course in Carmen. Essentially copying content from one course to another. To Import Course Content, you will need to have access to both the course you are importing to and the course you are copying from.
- This resource will focus on importing content from another course, but you can also export a course or course content, if desired (see external resource on exporting Canvas course content).
Steps to Import Course Content (screenshots below correspond with numbered steps)
- Within your course, go to “Settings” in the course navigation
- Select “Import Course Content”

- Select to “Copy a canvas course”
- Find the course you would like to copy from the search bar
- Select if you are copying “All content” to copy the entire course into this course, or “Select specific content” if you are only copying specific parts of the course
- Don’t forget to hit the import button!
- You will then be sent to a screen showing you that the course is copying (it’ll run and then show when it’s finally copied)

- If you chose to “Select specific content” you will see a new “Select Content” box under the Current Jobs. Click this new “Select Content” box.

- A new dialogue box will open showing the available content to copy. Select the specific content you’d like to copy
- Click the “Select Content” button to begin importing the content you selected
- You will then be sent to a screen showing you that the course is copying (it’ll run and then show when it’s finally copied)

Update Due Dates
Due dates and availability dates on assignments within your course are easy to update using the new Bulk Date Editor in CarmenCanvas. Follow the steps of this Canvas tutorial on doing bulk updates of due dates and availability dates. Due dates can also be easily edited by using the drag and drop feature in your course calendar. Here’s a Canvas tutorial on the changing due dates using the calendar.
Publish Course
To make your course content visible to students, you must “Publish” your course. Publishing a course allows enrolled students to access the course and any course materials (modules, assignments, etc.) that you have published within the course. Please note, you will not be able to send course communication (announcements, messages) within the course until the course is published.
Steps to Publish Course (screenshots below correspond with numbered steps)
- From your course homepage, click the “Publish” button located under Course Status

Add Additional Users to Course
Registered students will be automatically enrolled in your course, based on information from the Registrar. Student registrations will populate and update each night. Enrolled students will show under the “People” tab in your course. Similarly, Instructors and TA’s listed in SIS will also be automatically enrolled in the course. To add additional users to the course, follow the steps in this section.
- Use this option to add additional Instructors, TA’s, Course Designers, etc. Learn more about the various Roles available in your CarmenCanvas course, through ODEE’s quick guide to CarmenCanvas roles resource.
Steps to Add Additional Users Course (screenshots below correspond with numbered steps)
- Navigate to the Carmen “My Courses” dashboard (typically the first page upon logging into Carmen)
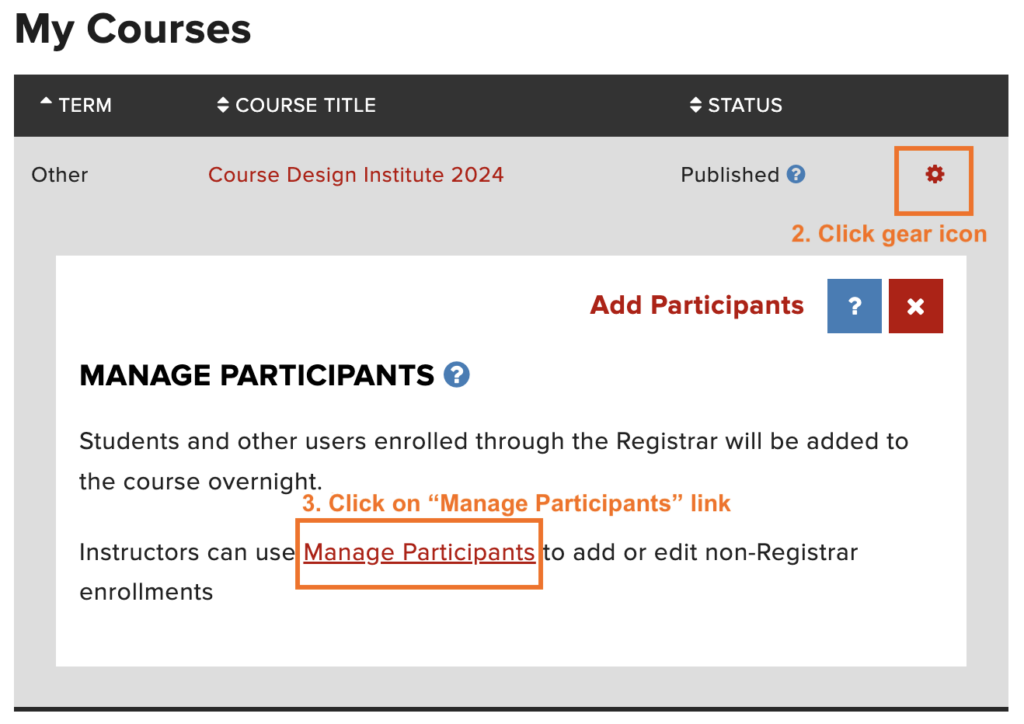
- Select the gear icon next to the course title
- Click on the “Manage Participants” link

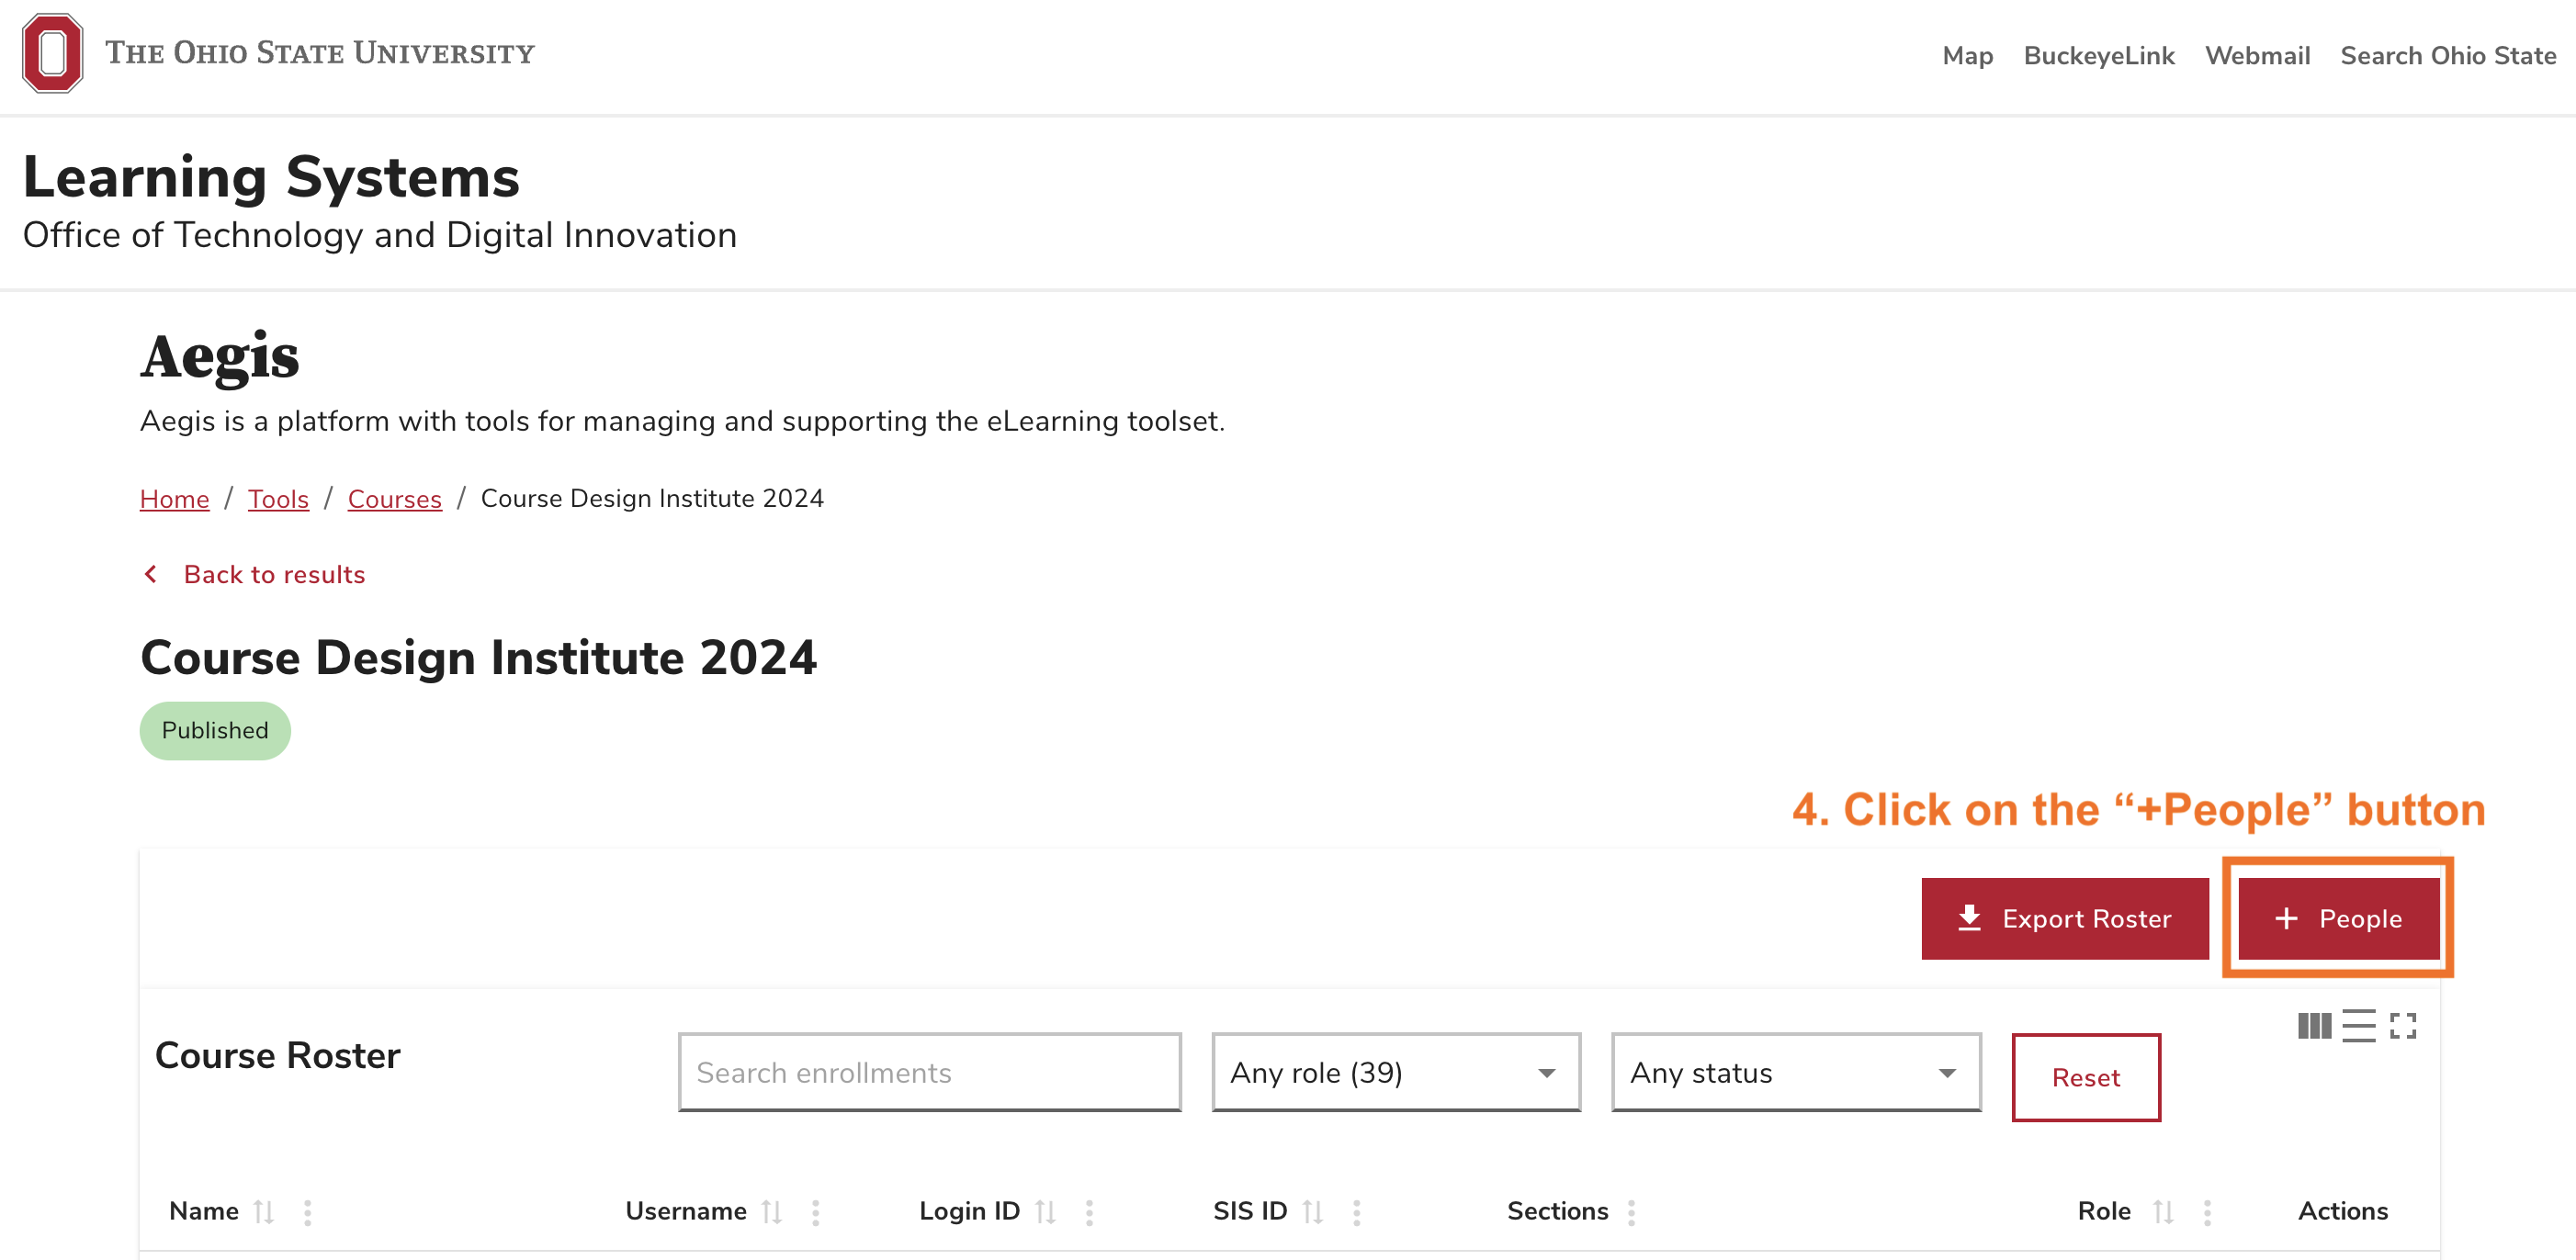
- Manage Participants will take you to the Aegis portal. Click on the “+People” button to add participants to your course

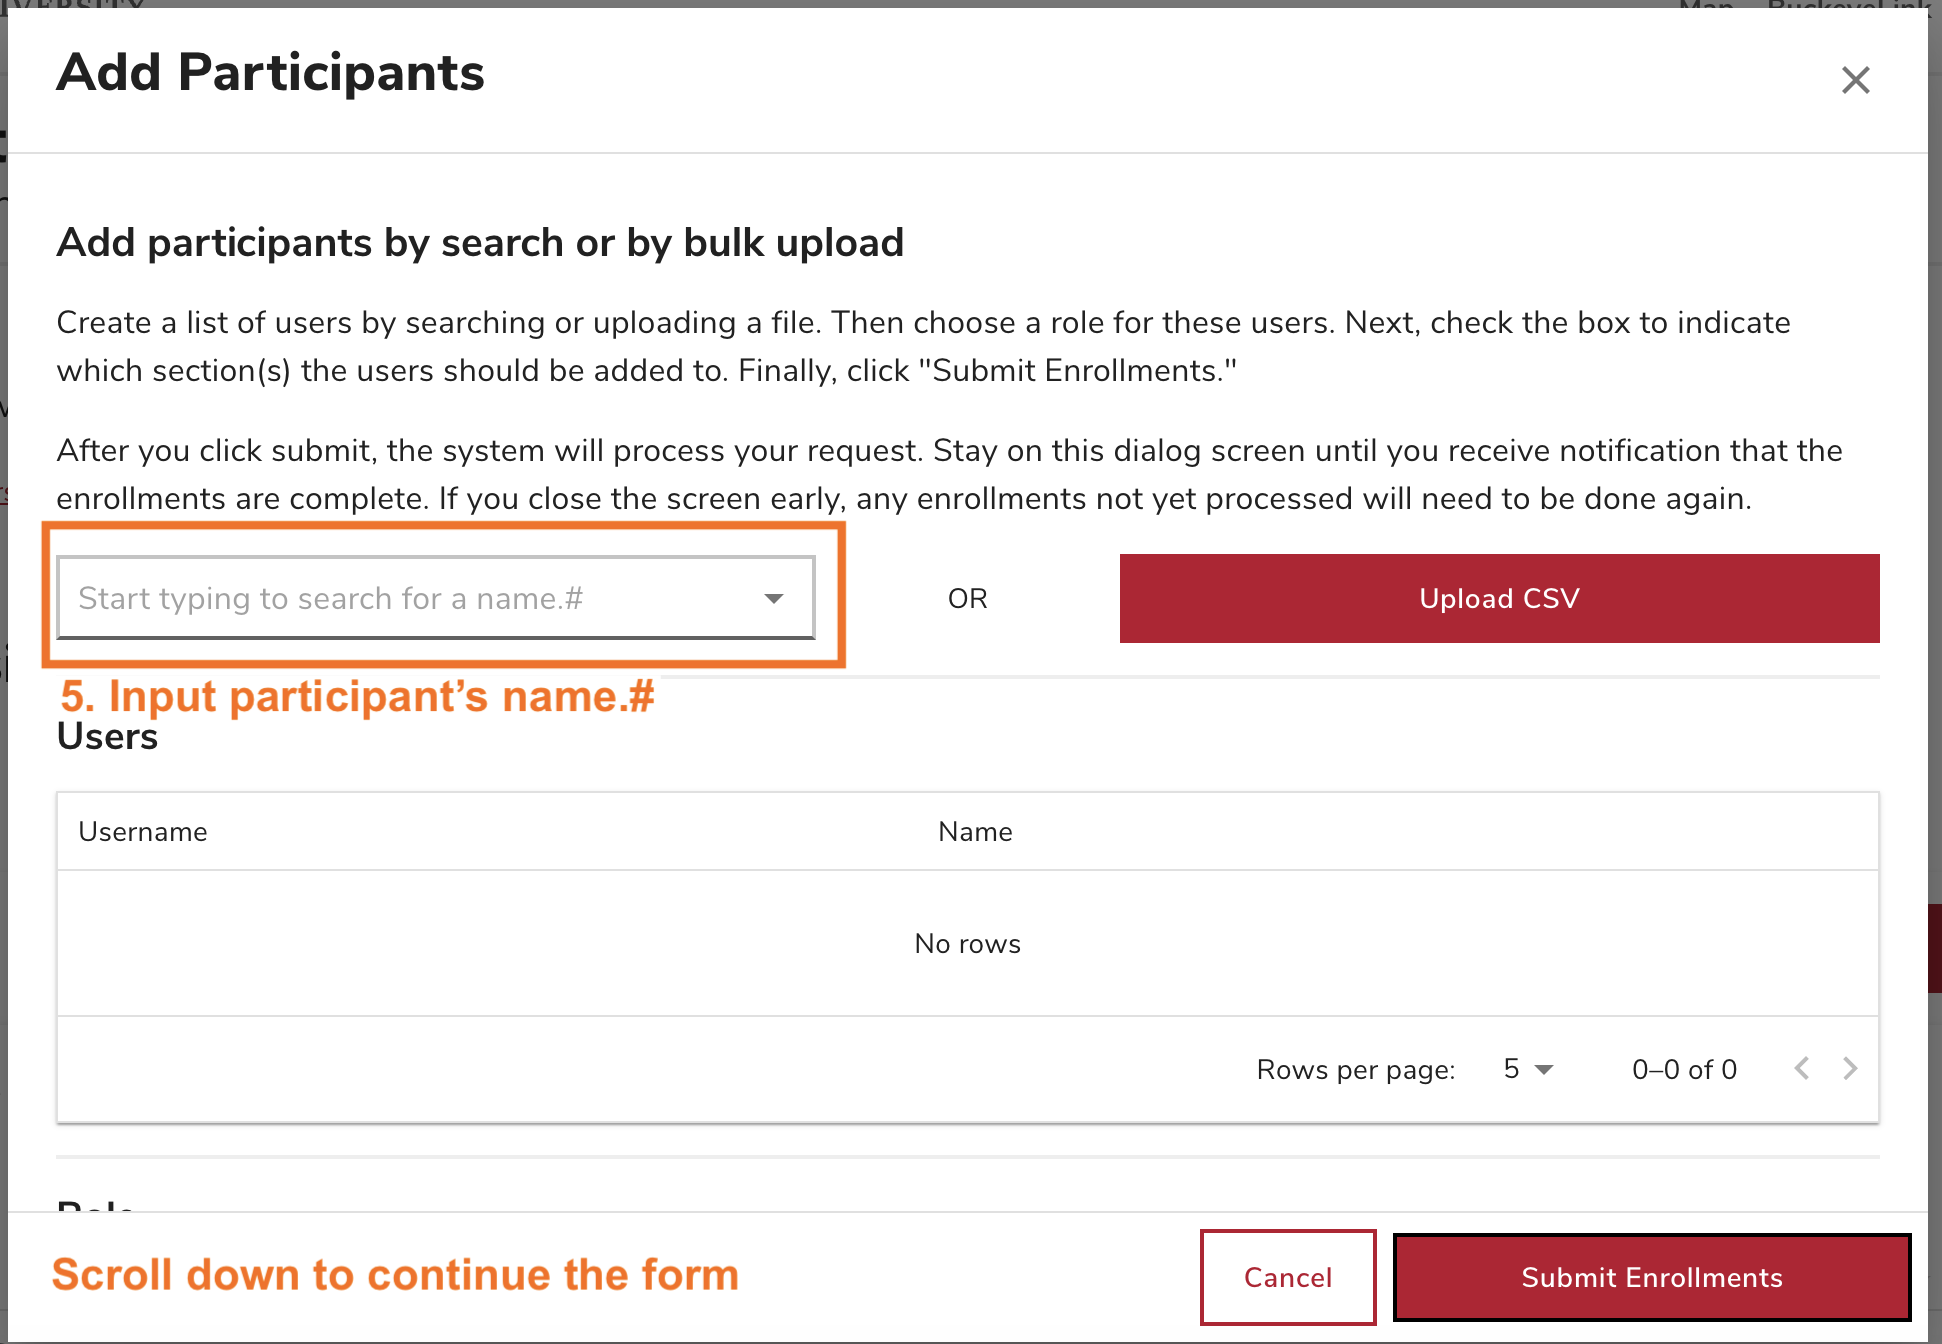
- For individual participants, add them by inputting their name.# in the search box. Scroll down to continue the form

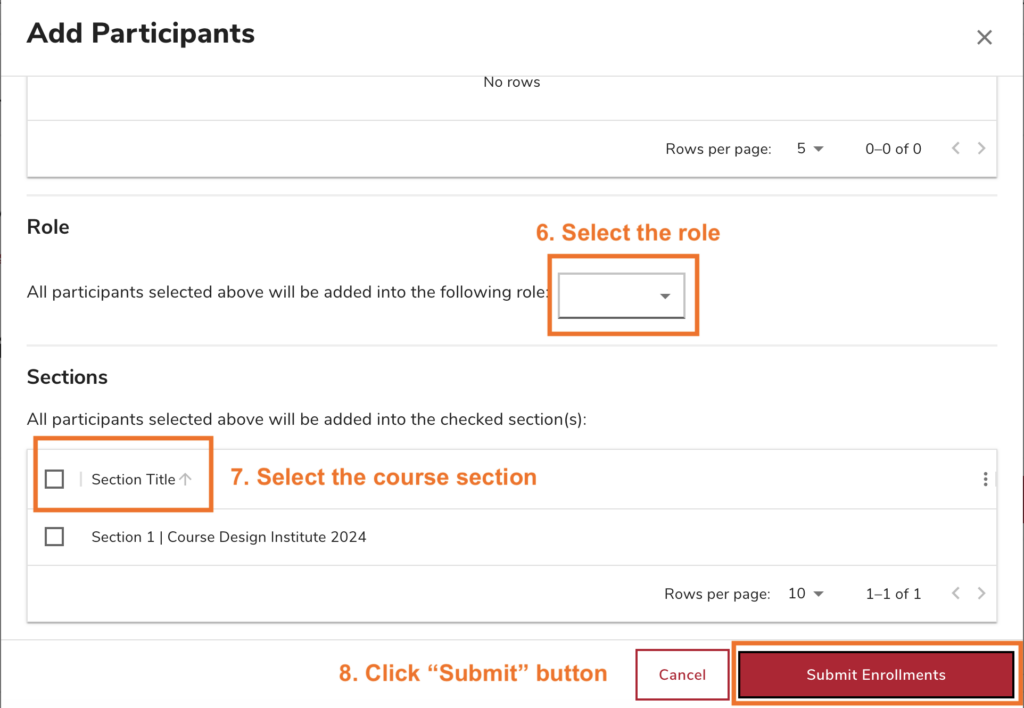
- Select their role.
- Select the section of the course where you want them added. To add the participant to all sections, click the top check box next to “Section Title”
- Click on “Submit Enrollments” when you are ready to add participants

